Origami Owl Instructions

The origami owl may look simple, but there are some tricky folds in this design! You will also need a pair of scissors for this model. It's well worth the effort!
For a printable pdf version of the owl instructions, click here.
You will need Adobe Reader installed on your computer in order to open the .pdf file. You can get Adobe Reader here
 |
 | |
|
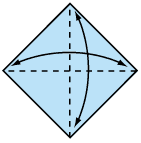
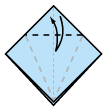
1. Start with a square piece of paper, coloured side up. Fold in half one way, then open. Then fold in half the other way and open. |
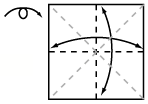
2. Turn the paper over to the white side. Fold the paper in half, crease well and open, and then fold again in the other direction. |
 | |
|
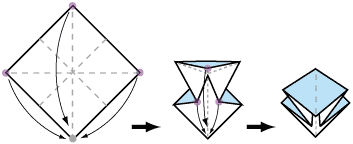
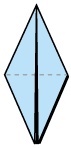
3. Using the creases you have made, bring the top 3 corners of the model down to the bottom corner. Flatten model. |
 |
 | |
|
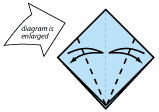
4. Fold top triangular flaps into the centre and unfold. |
5. Fold top of model downwards, crease well and unfold. |
 |
 | |
|
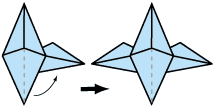
6. Open the uppermost flap of the model, bringing it upwards and pressing the sides of the model inwards at the same time. Flatten down, creasing well. |
7. Turn model over and repeat steps 4-6 on the other side. |
 |
 |
 | ||
|
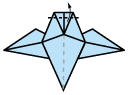
8. Fold front flap down. |
9. Fold back flap down. |
10. On the top layer, fold the top corners in to the centre line, and repeat on back. |
 |
 | |
|
11. Form the wing by lifting up from the inside, and twisting the wing forwards, then squashing down. Repeat for other wing. |
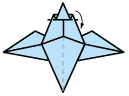
12. Fold top of model down as shown. |
 |
 |
 | ||
|
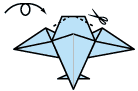
13. Fold back up along crease shown. |
14. Fold whole top down along crease shown. |
15. Cut ONLY TOP layer, along the line shown. |
 |
 |
|
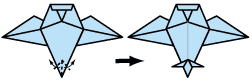
16. Fold top flaps upwards to form feet. |
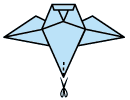
17. Turn owl over and cut slits through the top layer only as shown. |
 | |
|
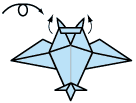
18. Turn back over and lift up the ears. Finshed owl. |
Make other birds and animals like the origami owl.

