Origami Flamingo
 1. Start with a square piece of paper, coloured side up. Fold the top corner of the paper down to the bottom corner. Crease & open again. Then fold the paper in half sideways. |
 2. Turn the paper over to the white side. Fold the paper in half, crease well & open, then fold again in the other direction |
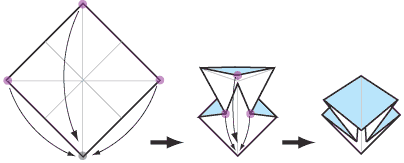 3. Using the creases you have made, Bring the top three corners of the model down to the bottom corner. Flatten model |
 4. Fold top triangular flaps into |
 5. Fold top of model downwards, crease well and unfold |
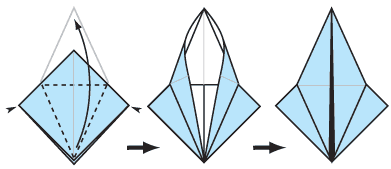 6. Open the uppermost layer of the model, bringing it upwards and pressing the sides of the model inwards at the same time. Flatten down, creasing well. |
 7. Turn model over and repeat Steps 4-6 on the other side. |
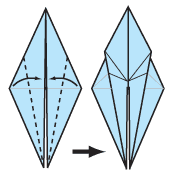 8. Fold outer edges into the centre. |
 9. Turn over and repeat step 8 |
 10. Fold one side in to the centre line (the top layer only) |
 11. Mountain-fold the |
 12. Fold left side upwards along |
 13. Inside reverse fold along the crease just made. |
 14. Fold this crease as shown, |
 15. Fold down head, crease and |
 16. Fold down front wing along crease shown, and repeat on the back. |
 17. Fold down point at top in line with wings, and tuck in behind back wing. |
 18. Optional step: Flamingos have beaks that point downwards, so if you like you can fold the tip of the beak to make him look more realistic! |
