Origami Lucky Star Instructions

The origami lucky star is so easy to make, but it looks so pretty... soon you'll be making hundreds!
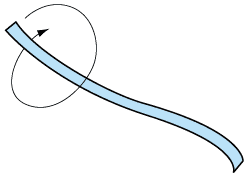
You make it with a strip of paper. A good starting size is about 30cm, or 1 foot long, and about 1cm wide, or about half an inch.
Once you have made a couple, you can choose the length and width that you think makes the best star.
For a printable Pdf of the lucky star instructions, click here.
You will need Adobe Reader installed on your computer in order to open the .pdf file. You can get Adobe Reader here

 |
 | |
|
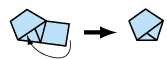
1. Start with a strip of paper. Tie a "knot" in the end of your paper. |
2. Pull gently to tighten, then flatten. | |
 |
 | |
|
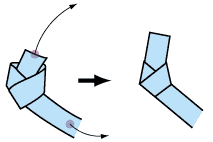
3. Fold the end of the strip down and tuck it into the knot. You can cut a bit of it off if it's too long. |
4. Now wrap the other end of the strip around and around this pentagon you have formed, creasing gently as you go. | |
 |
 | |
|
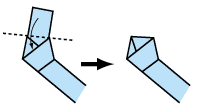
5. Keep wrapping until you get to the end of the strip. Tuck the last bit of the strip into the pouch. You should be left with a cute little pentagon. |
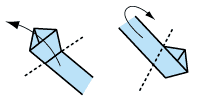
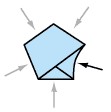
6. Now to make this little pentagon into a star, very gently and slowly use your fingernail to press on the centre of each of its edges. The star should puff out. |
 | |
|
And you should have a lovely little lucky star! It may take some practise to get the star to puff out perfectly, but stick with it... you’ll get it! If you are having a lot of trouble, try different papers, or try wrapping the strip of paper around without creasing it too much. This helps a bit! |
Browse other models like the origami lucky star

